Friday, December 19, 2014

Horehound Cough Drops


Don’t you just love it when what you need is there when you need it?  The universe at work.  My husband came down with this weird cough and I had just noticed that the horehound in the garden was still green and vibrant.  Not sure how that happened in mid-December where there has already been snow and freezing weather, but not getting around to cleaning up that part of the garden paid off.

So I made him some horehound cough drops, something I have always wanted to try.  They came out great, now I just need more people with coughs J  Here’s the recipe, if you have given them a try or have any tips, let me know.

Recipe:
There are many recipes for horehound cough drops and I decided to keep it simple with just horehound, ginger and honey:
Horehound – 2 cups fresh (or 1 cup dried)
Ginger – a small finger, peeled and sliced
Water – 1 cup water to each cup herbs
Honey – 3 cups (1 ½ cups honey to 1 cup “tea”)
Cream of tartar – ½ tsp


Steep the horehound and ginger in the water, I used 2 cups of fresh horehound to 2 ½ cups water, allowing for some water evaporation.  Let steep 30 minutes, strain.  I had a little over 2 cups of “tea”.   Add “tea” to a large pot and add the honey and cream of tartar.  


Boil until mixture reaches 300 degrees, use a candy thermometer to ensure the mixture reaches candy stage.  Grease a flat pan with sides with butter or use cooking spray.  Pour mixture into pan and spread out.  Let cool.


 To make the cough drops I tried 3 different methods – balls, cut squares and breaking the candy into pieces.

1.       Balls – When the mixture cools to a point where it can be handled, roll a small amount of mixture into a ball.  Grease hands with butter so avoid sticking.  You need to work fast as the mixture gets hard pretty quickly.  Place on wax paper to cool completely and harden.

2.       Squares – When the mixture cools to the point it is like salt water taffy, roll it out and cut with a sharp knife into squares.  Place on wax paper to cool completely and harden.  Of the 3 methods, I thought this was the easiest and came out the best.

3.       Break into pieces – while the mixture is in the pan and it has cooled to the taffy consistency, score the mixture into bite size pieces.  When totally hardened, remove from pan and break into pieces.  I found I could easily remove the candy from the pan but that it didn’t crack at all like I had scored it.  It was difficult to know the exact best time to score it, I tried at several points.  So this came out as chunks of cough drops.

Store the finished cough drops in an airtight container, I lined a tin with wax paper to store them.  This recipe made a lot of cough drops, probably at least 75 in various sizes (and chunks).  I’m not sure of the shelf life, will need to do some more research to figure that out.

A few tips from the experience:
The mixture boils up quite a bit, I had to change pots twice to allow it to boil rapidly enough to get to the high temperature and not boil over the sides of the pot.  So use a very big pot.

I’m not sure what the purpose of the cream of tartar is.  I thought it was to help keep the mixture from foaming when boiling, but I had quite a bit of foam when it boiled and still some when I poured it into the pan.  I tried adding some butter to the mixture to stop the foaming as that helps when making jellies, but it didn’t seem to make a difference either.

Get a candy thermometer.  I didn’t have one so had to do continually testing to see when it got to the candy stage and eventually just guessed.   It would have helped quite a bit.

Experiment, next time I will try adding some other herbs, maybe rosemary and/or thyme too?

Friday, October 17, 2014

Coriander Harvest Time


It's only recently that I started using coriander in my cooking and I've found out I love the flavor.  So this year I decided to harvest my own.

Coriander is the seed of the cilantro plant, Coriandrum sativum.  Lots of people don't know that they come from the same plant, and in the US we tend to call the green leaves cilantro and the seed of the plant coriander.  In England the leaves are called coriander also so if you have a recipe make sure you know whether it is referring to the leaf or seed.

So on this beautiful Fall day with the trees in all their glory I basked in the glow of the red, orange and gold shining on the garden and harvested the coriander.

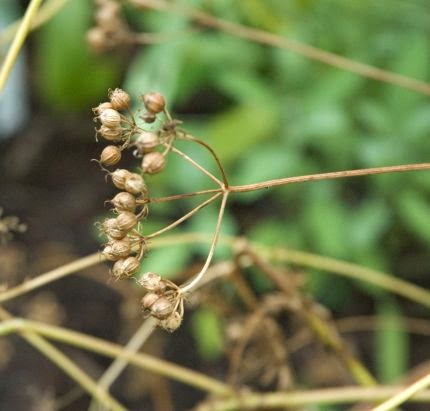
In order to have the seeds you need to let some of your cilantro bolt and go to seed.  That's not difficult, and if you're like me the cilantro seems to bolt when I'm not looking!  So let a few plants flower and then the flowers will turn to seeds.  You want to make sure that the seeds are brown, as the picture above, not green when you harvest them.  The green seeds will be bitter and also contain too much moisture to store for any length of time successfully.

I like the paper bag method of harvesting seeds and use the same method for coriander that I do with dill.  Once the seeds are brown, I cut the stems and place them seeds and all in a brown paper sandwich bag.  You can use a larger brown shopping bag if you like or a plastic bag, whatever works for you.  I then shake the stems and the seeds pretty much just fall off.  For those that don't, I just rub them on the stem and they fall off.

Coriander seeds are small and easily drop all over the place.  I like to shake the stem just a little bit over the garden when I cut it so the seeds will self-sow for more cilantro plants next year.  The harvesting can be a bit messy so who knows where the cilantro will show up?

I also save a few seeds for planting next year, just in case the self-sowing doesn't happen but I usually find cilantro and dill popping up all over the garden in the Spring which I love.

So plan to harvest your own coriander next year!

Wednesday, January 29, 2014

World Wide Fire Cider Making Day Feb 2nd

I wrote the article linked below for Spirit of Change Magazine about the current controversy going on about the trademarking of the term Fire Cider.  In honor of this, a World Wide Fire Cider Making Day is being held Feb 2nd - make up a batch to help you through this cold winter! 

Click here to read the article:   Keep Fire Cider Free

Update:  Here is the Fire Cider my daughter and I made on Sunday for World Wide Fire Cider Making Day.  It was fun and came out great, need to let it sit for a few weeks and then we'll be drinking it up.  If you made some, share a pic!

Wednesday, August 7, 2013

Elderberry Harvest

One of the most frustrating things about trying to harvest elderberries I've found is that the birds get to the berries before I do!   I have several spots where I pick some of the elder flowers and then wait anxiously for the berries and then for them to ripen and then all hope is dashed when they are suddenly gone.

So I decided last year that I would plant my own elderberry in a new garden spot where I would try to keep the birds away.  So far it has worked and I picked the first of the berries today.

So how do you harvest elderberry?  Harvest ripened berries in August or September, they seem very early this year.  Ripened berries are purple or dark red, don't pick them when they are still green.  Clip the entire berry head on the stem right below the berries.

The berries need to be kept cool.  Strip them off the stem and place in the refrigerator.  The stems contain a gluey substance so you don't want stems in whatever you are making.  Removing the stems can be a very time consuming process.  Some people use a fork or comb, others freeze the berries first and the stems fall off - you will need to find what works best for you.  I do it the old fashioned way and just pluck them off.  Be careful not to crush the berries and lose the juice however.

 Keep the berries refrigerated and use immediately or the berries can be dried or frozen for future use.  Uncooked berries have a dark purple juice and are inedible and astringent - make sure to cook the elderberries before you ingest them.

My favorite use of elderberries is to make elderberry syrup, and if I can get enough berries this year I want to try making some elderberry jam.   Elder wine is a popular use also.  What are your favorite uses of elderberries?


Sunday, June 30, 2013

Lemon Balm

Lemon Balm!  It has been ages since I've added a new post, but a great workshop on lemon balm at the International Herb Symposium presented by Mimi Hernandez had such great information I just had to share.  I for one take my lemon balm for granted and often curse at it as it pops up all over the garden, never where I want it, and can easily take over a whole bed if I'm not careful.  So its easy to forget what a wonderful  herb this is and why it should be all over the garden.

I thought I knew a lot about lemon balm but as with all herbs, there is always more to learn.  The botanical name, Melissa, is Greek for honeybee.  I learned that lemon balm planted around bee hives keep bees happy, and also repels flies and mosquitos.

I often use lemon balm as an effective nervine for anxiety and sleep but learned that its relaxant properties are also helpful with hypertension, irritable bowel and colic. 

Research being done on lemon balm shows effectiveness in cognitive improvement and can be helpful with Alzheimers.

Lemon balm also helps with thyroid activity and is beneficial for hyperthyroidism.  There seems to be conflicting views about its effects on hypothyroidism, some say it has a negative effect by dropping TSH and others that it has a balancing effect on the thyroid and regulates it.  Seems like there needs to be more studies in this area.

And to top it off, lemon balm is antiviral helping with flu, measles, shingles and herpes.  A tincture can be made at a 45% alcohol level.  It has a relatively short shelf life so it was recommended that tincture be made fresh every year.

And check out Mimi's website and her One World Healing Community, www.mimihernandez.com.  She's a great teacher and a wealth of information.

Monday, September 3, 2012

Sage Mountain: The Shaman’s Path, Women Shamanism, Spirituality and Healing Plants


Just came home from Sage Mountain Herbal Retreat Center in Vermont after a weekend of a great workshop called The Shaman's Path.  Workshop doesn't seem like a big enough word to describe the weekend however.  We learned with wonderful healers and shamans Rocio Alarcon, Susan Ross Grimaldi and Maria Elena Martinez, a collection of 40 amazing women and of course, Rosemary Gladstar.

The magic of Sage Mountain is difficult to put into words.  I hadn't been back for a couple years and needed to just ground to the earth there again.  I was able to work with yarrow as a power plant this visit, learned to drum a bit and challenged myself to participate in activities outside my personal comfort zone. 

And there was such laughter and good friends made.  It was a group of women in the best sense, which sometimes doesn't happen.  Strong, independent, open, honest, vulnerable, healing, sensitive, loving, giving, kind and searching - it was quite a group as we all shared and learned from each other.

I was enthralled with Susan Ross Grimaldi's work in Mongolia and China documenting and helping re-institute the ancient history of shamanism there (see more about Susan on her website  http://susangrimaldi.com/).  Her words on personal power touched deep inside and the responsibility that personal power invokes in the healing process.  And through her talk on Shaman Chants, finding my own personal song (thanks to my workshop partner and friend Linda helping with this), which we all have inside us, just waiting to get out.

Rocio Alarcon brought her work from Ecuador and the Amazon rain forest as well as the Basque country in Spain to work with us on spiritual cleansing and healing through water.  A very special evening healing water ceremony under the full moon in the clean, cold Vermont water on that magical piece of earth was transforming.   I was especially blessed to be Rocio's partner in this ceremony, an extra added bonus.

And as we talked about herbs used in the shamanic process and did energy healing with the plants, I'm forever amazed and grateful of the healing bounty that is all around us.  We asked for healing for women around the world who are suffering, oppressed, violated, and marginalized, sending the healing of the plants and recognizing the shaman in each of us in the process.   May we all be thankful for what we have and who we are, and use that in going out into the world to foster healing, kindness, peace and love.


Tuesday, August 21, 2012

Aack, It's a Groundhog!

I knew I was in trouble the other day when one of my big, beautiful but still green tomatoes was missing the whole side.  Someone took a bite right out of it hanging on the plant and left it there, half eaten.  Guess it wasn't ripe enough.

So as I'm eating lunch today looking out at the garden, 'Phil' goes lumbering across the garden, briefly looking at me sitting inside.  As I jump up and get my camera and sneak to see where he is going, he munches on some parsley and then strolls past the nasturium towards the gate.  In no hurry, but guess he wasn't too hungry because he didn't seem to eat anything else.  Here he is above, unfortunately the echninacea was in the way to get a good shot of his head, but that rolly polly body and bushy tail give it all away!

So if he's strolling around in the middle of the day, I know he has found my little garden and I have a battle on my hand.  Guess I know where the chard went.  I read "The $64 Tomato" a few summers ago and laughed outloud at the chapter about the groundhog, but I guess I'm not laughing now.

AAAHHH, so NOT want I want to deal with in the garden.